FortiClient

Systems

Microsoft

Linux

Insightful Employee Productivity Monitoring Tool Installation Process for Version of Linux

Insightful is the best employee productivity monitoring tool which support to the version of Linux operating systems.


This article is describing the installation process of Insightful to Linux operating systems. Because the website doesn’t have the clear guide to install it for Linux operating systems except the Windows and Mac OS environments.


The installation process is different for personal and company computers.


Company Computers


Company computer installation is done using the Linux terminal. In order to create a terminal line, you need your organization ID.


1. To get your unique Organization ID, first, log in to Insightful as the admin.
2. Go to Add New Employee > Company computers > Download for MacOS
3. In the terminal line, part of it will be your Organization ID. It looks like this:

export base="https://storage.googleapis.com/workpuls-updates/mac/daemon"; /bin/bash -c

"organizationId="OrganizationID"; $(curl -fsSL $base/install.sh)" 

4. Copy your Organization ID into the following:

export base="https://storage.googleapis.com/workpuls-updates/linux/service"; /bin/bash -c

"organizationId="organizationID"; $(curl -fsSL $base/install.sh)"

5. Newly created terminal line should be copied into the Linux terminal, press enter and the installation will begin.


Personal Computers

After you send personal computer invites, you should follow these steps:

2. Right click on the file and choose Properties
3. On the “Permissions” tab, check the option “Allow executing file as a program
4. Exit the window and double click on AppImage file

Microsoft Exchange Admin Center Forward email to Multiple Users


1. Go to the Microsoft Admin Center (Tenet)

2. Click on "Exchange".


3. Click on "Mail Flow" then "Rules".


4. Click on the "+" icon to setup the new Rule.


5. Please use the below screenshot to add the mail forwarding rule.


  • Please give the name to "Name" filed, it must be meaning full name to identify later if you want.
  • Select the "The recipient is.." from "Apply this rule if.." filed. Then select the recipient email you want to add mail forwarding rule.
  • Select the "Redirect the message to.." from "Do the following" filed. Then you have to select to email address which you want to forward that recipient emails.

  • After that please tik on the "Stop processing more rules"
  • And make sure the select the "Header and envelope" for "Match sender address in message" filed.
5. Click on "Save" and now it is done.

File Permissions in Linux / Unix Environment - How to Read, Write & Execute?


The type of owners are represented as,


u - User/Owner

g - Group

o - Other

a - All


Lets say if you give the permission as "0123", that means


0 for - User/Owner

1 for - Group

2 for - Other

3 for - All


You can use the following symbolic to change the user permission.


"+" Adds a permission to a file or directory

"–" Removes the permission

"=" Sets the permission and overrides the permissions set earlier.


Here I mentioned the user permission types to anyone can use.


Number Permission Symbol
0 No Permission -
1 Execute -x
2 Write -w-
3 Execute + Write -wx
4 Read r–
5 Read + Execute r-x
6 Read +Write rw-
7 Read + Write +Execute rwx

How to Setup Samba File Shares in Linux – Quick and Easy


First of all if you didn't install the Samba, please use the below command to install it.

sudo apt update

sudo apt install samba

And you can check it whether it install or not using the below command.

whereis samba

If it successfully install you can get the some output related to the Samba, if not there is no output to visible.


Before config the Samba in your Linux environment, please backup your previous Samba configuration file if you already have the some Samba sharing settings. if not you can start it as the fresh configuration.


Please use the below command to backup the already having Samba configuration file.

sudo cp /etc/samba/smb.conf /etc/samba/smb.conf.orig

As a second step please create the folder you want share using the Samba,

mkdir /<path>/<FolderName>/

Now we can assign the permission for folder.

sudo chmod -R 0775 /<path>/<FolderName>

If you want you can check the permission using below command.

sudo chown -R nobody:nogroup /<path>/<FolderName>

Finally we need to configure the directory as a share using Samba configuration file.

sudo nano /etc/samba/smb.conf

It is locate the above path and you can open it using the above command.

Please add the below settings to the configuration file.

[FolderName]

comment = FolderName

path = /<path>/<FolderName>

public = yes

writable = yes

guest ok = yes

browsable = yes

read only = no

force user = nobody

Then press "Ctrl-O" to save it and "Ctrl-X" to exit from the nano text editor.

After that we need to restart the Samba and please use the below command to restart it.

sudo systemctl restart smbd

or

sudo service smbd restart

Now you can access it from your Windows or Linux environment using the below commands.

Windows,

\\ip-address\<FolderName>

Linux,

smb://ip-address/<FolderName>


How to Install a Software as an Administrative Privilege? - Quick Assist


If you have the remote privilege you cannot pass the administrative credentials to users windows unless user login as the administrator user account.

But there is one method to do it specially when you have to install the software in user's computer.

Please follow the my previous blog post to remote connect to the user computer.

How to use the Quick Assist

After that, 

  • Shift+Right Click on the software
  • Select “Run as different user

  • Give the Administrative credential as below and install it.

If the additional windows appeared in the users windows to approve it, please aske user to approve it.


How to use the Quick Assist


Please follow the below steps.

  • Open Quick Assist tool.
  • Click on “Assist another person
  • Sign in with your password.
  • Give the security code to user.
  • User need to enter that code in “Code from assistant” & click on “Share screen

  • Select “Take full control” and click on “Continue
  • User need to click on “Allow

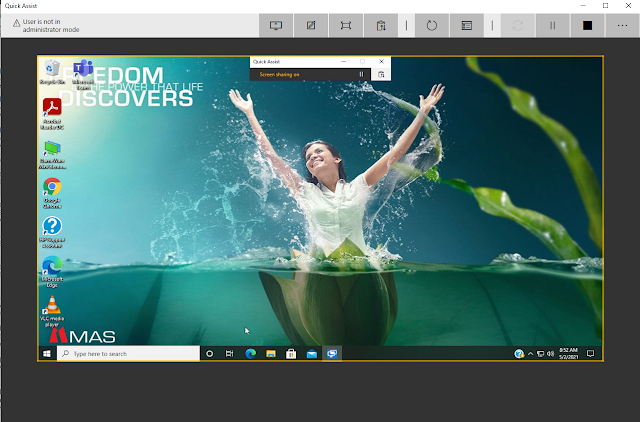
If the above task are done, you can see the users windows as the follows.