FortiClient

Systems

Microsoft

Linux

Insightful Employee Productivity Monitoring Tool Installation Process for Version of Linux

Insightful is the best employee productivity monitoring tool which support to the version of Linux operating systems.


This article is describing the installation process of Insightful to Linux operating systems. Because the website doesn’t have the clear guide to install it for Linux operating systems except the Windows and Mac OS environments.


The installation process is different for personal and company computers.


Company Computers


Company computer installation is done using the Linux terminal. In order to create a terminal line, you need your organization ID.


1. To get your unique Organization ID, first, log in to Insightful as the admin.
2. Go to Add New Employee > Company computers > Download for MacOS
3. In the terminal line, part of it will be your Organization ID. It looks like this:

export base="https://storage.googleapis.com/workpuls-updates/mac/daemon"; /bin/bash -c

"organizationId="OrganizationID"; $(curl -fsSL $base/install.sh)" 

4. Copy your Organization ID into the following:

export base="https://storage.googleapis.com/workpuls-updates/linux/service"; /bin/bash -c

"organizationId="organizationID"; $(curl -fsSL $base/install.sh)"

5. Newly created terminal line should be copied into the Linux terminal, press enter and the installation will begin.


Personal Computers

After you send personal computer invites, you should follow these steps:

2. Right click on the file and choose Properties
3. On the “Permissions” tab, check the option “Allow executing file as a program
4. Exit the window and double click on AppImage file

FortiClient SSL VPN Stuck at 98% on Windows 10 then Immediately Disconnects


Recently most of the users are face that FortiClient VPN reach to 98% and sudden disconnecting. This issue is not solve even after the restart.


This happened due to recent Windows update and there is only one solution to fixed it.


Once you reinstall the FortiClient SSL VPN software this issue can be fixed. Unless it dint worked and you can't connect to the VPN.

Microsoft Exchange Admin Center Forward email to Multiple Users


1. Go to the Microsoft Admin Center (Tenet)

2. Click on "Exchange".


3. Click on "Mail Flow" then "Rules".


4. Click on the "+" icon to setup the new Rule.


5. Please use the below screenshot to add the mail forwarding rule.


  • Please give the name to "Name" filed, it must be meaning full name to identify later if you want.
  • Select the "The recipient is.." from "Apply this rule if.." filed. Then select the recipient email you want to add mail forwarding rule.
  • Select the "Redirect the message to.." from "Do the following" filed. Then you have to select to email address which you want to forward that recipient emails.

  • After that please tik on the "Stop processing more rules"
  • And make sure the select the "Header and envelope" for "Match sender address in message" filed.
5. Click on "Save" and now it is done.

File Permissions in Linux / Unix Environment - How to Read, Write & Execute?


The type of owners are represented as,


u - User/Owner

g - Group

o - Other

a - All


Lets say if you give the permission as "0123", that means


0 for - User/Owner

1 for - Group

2 for - Other

3 for - All


You can use the following symbolic to change the user permission.


"+" Adds a permission to a file or directory

"–" Removes the permission

"=" Sets the permission and overrides the permissions set earlier.


Here I mentioned the user permission types to anyone can use.


Number Permission Symbol
0 No Permission -
1 Execute -x
2 Write -w-
3 Execute + Write -wx
4 Read r–
5 Read + Execute r-x
6 Read +Write rw-
7 Read + Write +Execute rwx

How to Setup Samba File Shares in Linux – Quick and Easy


First of all if you didn't install the Samba, please use the below command to install it.

sudo apt update

sudo apt install samba

And you can check it whether it install or not using the below command.

whereis samba

If it successfully install you can get the some output related to the Samba, if not there is no output to visible.


Before config the Samba in your Linux environment, please backup your previous Samba configuration file if you already have the some Samba sharing settings. if not you can start it as the fresh configuration.


Please use the below command to backup the already having Samba configuration file.

sudo cp /etc/samba/smb.conf /etc/samba/smb.conf.orig

As a second step please create the folder you want share using the Samba,

mkdir /<path>/<FolderName>/

Now we can assign the permission for folder.

sudo chmod -R 0775 /<path>/<FolderName>

If you want you can check the permission using below command.

sudo chown -R nobody:nogroup /<path>/<FolderName>

Finally we need to configure the directory as a share using Samba configuration file.

sudo nano /etc/samba/smb.conf

It is locate the above path and you can open it using the above command.

Please add the below settings to the configuration file.

[FolderName]

comment = FolderName

path = /<path>/<FolderName>

public = yes

writable = yes

guest ok = yes

browsable = yes

read only = no

force user = nobody

Then press "Ctrl-O" to save it and "Ctrl-X" to exit from the nano text editor.

After that we need to restart the Samba and please use the below command to restart it.

sudo systemctl restart smbd

or

sudo service smbd restart

Now you can access it from your Windows or Linux environment using the below commands.

Windows,

\\ip-address\<FolderName>

Linux,

smb://ip-address/<FolderName>


How to open a URL with CMD? - A simple BOT attack (Windows and Linux Command)


There is a simple command to open the website using the CMD. 

  • In Windows environment please use the below command.
start "" "https://systemssupports.blogspot.com/"
  • In Linux environment please use the below command.
xdg-open https://systemssupports.blogspot.com

If you want to setup a simple BOT attack to website, please use the below command,

for /l %x in (1, 1, 10) do (
   echo %x
   start "" "https://systemssupports.blogspot.com"
)

This file will be run the 10 times and if you want it increase it into 100 or 1000 please replace the 10 as 100 or 1000.

Please note that, this will be increase your processor and ram capacity will be harm to your computer.

The security database on the server does not have a computer account for this workstation trust relationship.


When the above error appeared before the login that means your computer is no longer communicate with the domain and you have to re add it.

Please follow the below instruction to re added the computer.

  • Login as a Administrator
  • Go to "About you PC"

  • Select "Rename this PC(advance)"

  • Select "Network ID..."

  • Select the "This computer is part of a business network: I use it to connect to other computers at work" and Next.

  • Select "My company uses a network with a domain" and select Next.

  • Select "Next".

  • Type the username / password and domain name and then click Next. (This should be administrator's domain adding account credentials)

  • Click on "Yes"

  • Select "Do not add a domain user account" and Select Next.

  • Select Finish.

  • Select the "Restart Now" and please login and check after the restart.

How do I fix a Repeated Password Prompt in Outlook?


If the above window always appeared,

  • Check the Password or Username is correct or not,
    • If you are using the App Password and you enter the normal login password this will be always prompt until you enter the correct App Password.
  • Password is expired or not,
  • login account is disabled or expired.

The above all checked and still you appeared the above window, there might be Credential Manager issue in windows. To avoid that please follow the below instructions.

  • Go to Control Panel

  • Select Credential Manager
  • Select Windows Credentials.
  • Select outlook.office365.com.
  • Select Remove.


  • Click OK and restart the computer.
  • After restart the computer, open the Outlook and give the password.

Please note that, don't do this while open the outlook and make sure to close all the Outlook windows before remove the credentials.

How to Install a Software as an Administrative Privilege? - Quick Assist


If you have the remote privilege you cannot pass the administrative credentials to users windows unless user login as the administrator user account.

But there is one method to do it specially when you have to install the software in user's computer.

Please follow the my previous blog post to remote connect to the user computer.

How to use the Quick Assist

After that, 

  • Shift+Right Click on the software
  • Select “Run as different user

  • Give the Administrative credential as below and install it.

If the additional windows appeared in the users windows to approve it, please aske user to approve it.


How to use the Quick Assist


Please follow the below steps.

  • Open Quick Assist tool.
  • Click on “Assist another person
  • Sign in with your password.
  • Give the security code to user.
  • User need to enter that code in “Code from assistant” & click on “Share screen

  • Select “Take full control” and click on “Continue
  • User need to click on “Allow

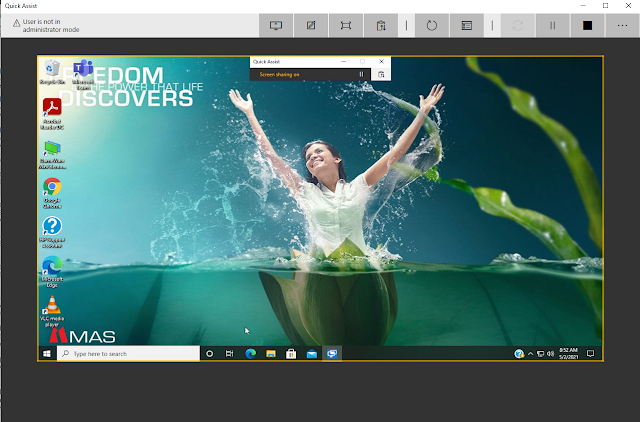
If the above task are done, you can see the users windows as the follows.


How to add Google AdSense ads.txt file to your BlogSpot blogger site


If you can see the above error screen in your Google AdSense account, that means your blogger site missing the ads.txt and need to add it.

Please follow the below step to add it.

  • Click on the "Fix now"
  • Click on the "Download" and download your "ads.txt" file and open it.
  • Copy the command
  • Go to the "Settings" in your blogger site.
  • Find the "Monetization"
  • Enable the "Custom ads.txt"


  • Click on "Custom ads.txt"
  • Paste the command which copy from the downloaded "ads.txt" file.

  • Click on "Save".
You can ensure it correctly working or not as the follow.
  • Add /ads.txt after your site URL.

My FortiClient VPN doesn't have the Uninstaller Option


My FortiClient VPN doesn't have the Uninstaller Option and only have the Repair Option. Therefor cannot Uninstall it.

If your FortiClient VPN or EMS doesn't have the uninstaller option, that means there might be have a corruption of VPN or restriction from the End Point Management System from your System Administrator.

If you want to uninstall it, there is one method to do it in using the the CMD.

  • Open Command Prompt (CMD) as an Administrator.

  • Type the following command and press "Enter" key.

wmic product where "name like 'Forti%%'" call uninstall /nointeractive
  • Then computer will be restart after the uninstall.
This command is very easy to uninstall all Forti production in your computer.

Message store has reached its maximum size...


Message store has reached its maximum size...

When the recovery folder exceeded the maximums capacity of it, the outlook no longer synchronize the mails and give the above error. 

To prevent that issue you can Shift + Delete the mails of  "Deleted items" folder in outlook and solve it instantly. 

Other than, you cannot send the mails and received the mails.

*Please note that ones you Shift + Delete the mails, you cannot recover it.

Complete Guide of FortiClient EMS


FortiClient EMS is paid version with more features to control your endpoint devices of your organization. There has several features and here I mentioned the basic explanation of each and every features.

  • Zero Trust Telemetry
This show us the your endpoint device is connect to the FortiEMS server and it is always connected and cannot disconnect without the pin code provide by the System Administrator. This is always connected either you use the personal internet source or organizational internet source. 


  • Remote Access
This is the normal VPN connected tab and you can use your login credential to login your organizational access. 


  • Sandbox Detection
This feature always check you mail attachments and saved documents if the it has virus or not. This is upload your document to there server and check it and redownload to your endpoint device before you open it or saved it.

This might be increase of data usage in your internet package and it is slower your computer performance. 


  • Web Filter
This is filtering your web access either you connected to the organizational internet source or personal internet source. And it is monitor all your internet activity through the organizational server and there are no any privacy and user have to be careful regarding that. 


  • Application Firewall
This is the firewall monitor the activity in your endpoint device.


  • Vulnerability Scan
This can be schedule to check the vulnerabilities in your endpoint device and it is faction as the virus guard.